


Home Assistant set up VM Wi-Fi connection via CLI
2026-04-20 – Agron Merseli
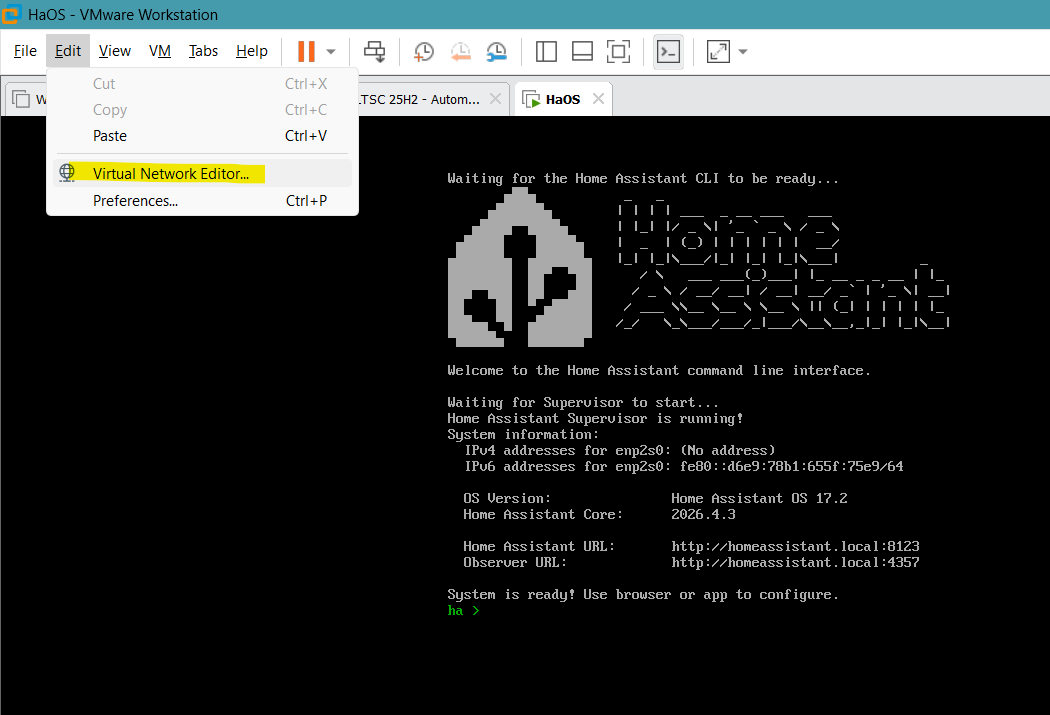
Open Virtual Network Editor from VMware Workstation.
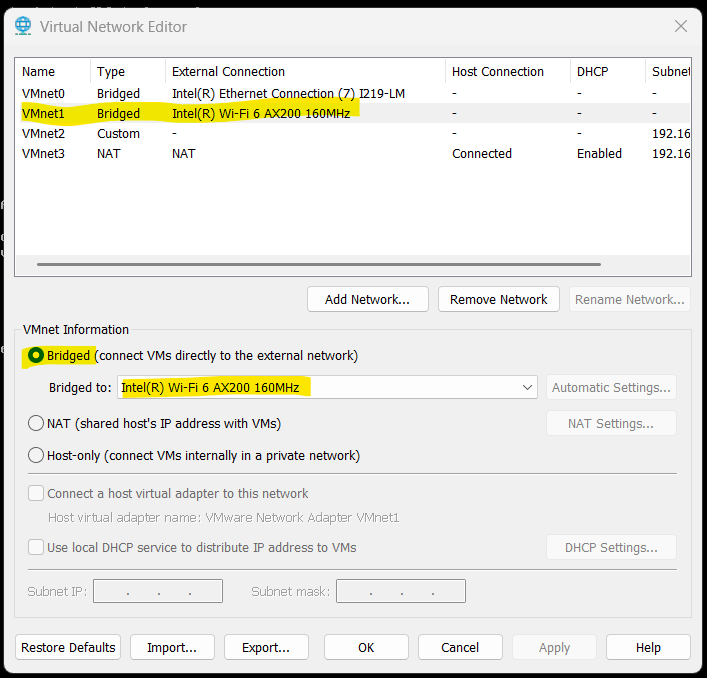
Set up the network as bridged to the Wi-Fi card.
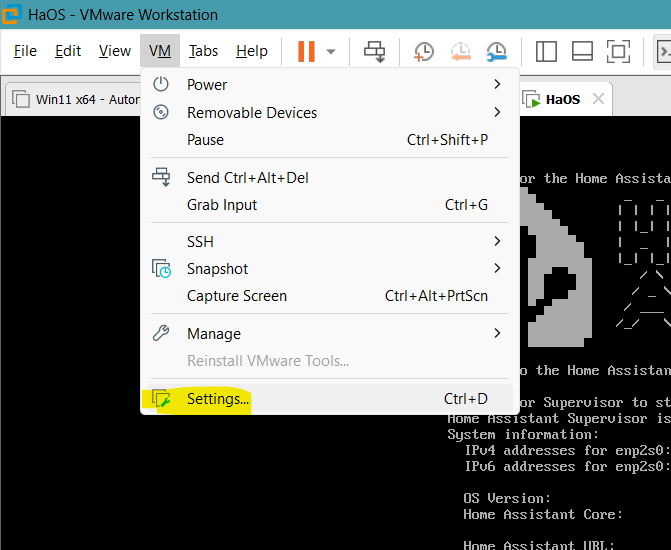
Enter the VM settings.
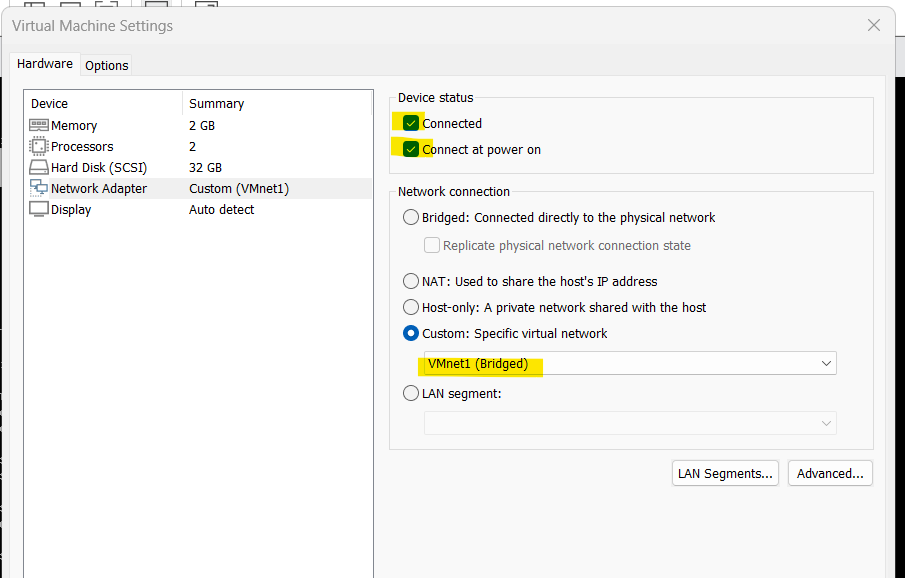
Select the virtual network.
Restart the machine.
Check if the router has not give any ip address.
Note the name of the network interface, in this case is enp2s0, this will not change also if you move the Vm to another machine.
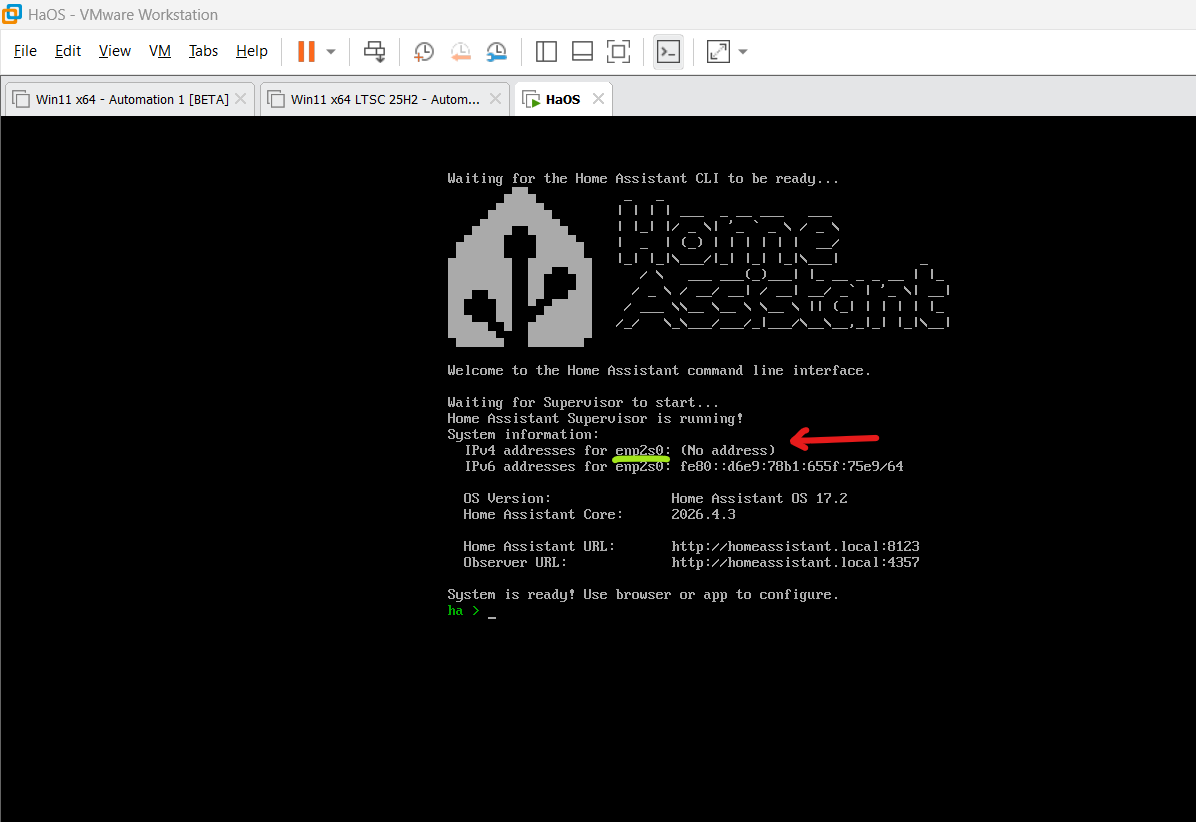
Now type the follow lines to permit to HA to connect to the existing Wi-Fi connection.
network infoCheck if network interface has no ip
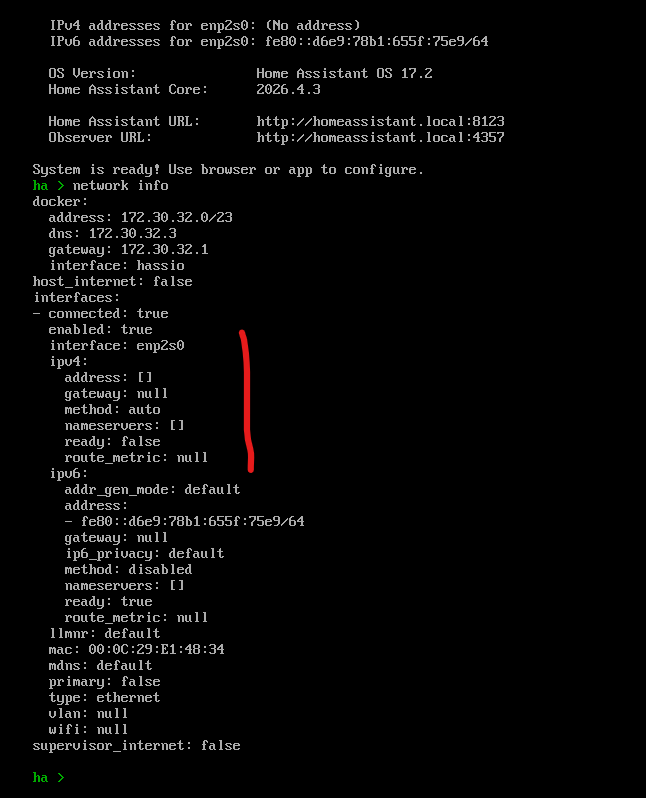
Now type the following command (remember to rename the interface)
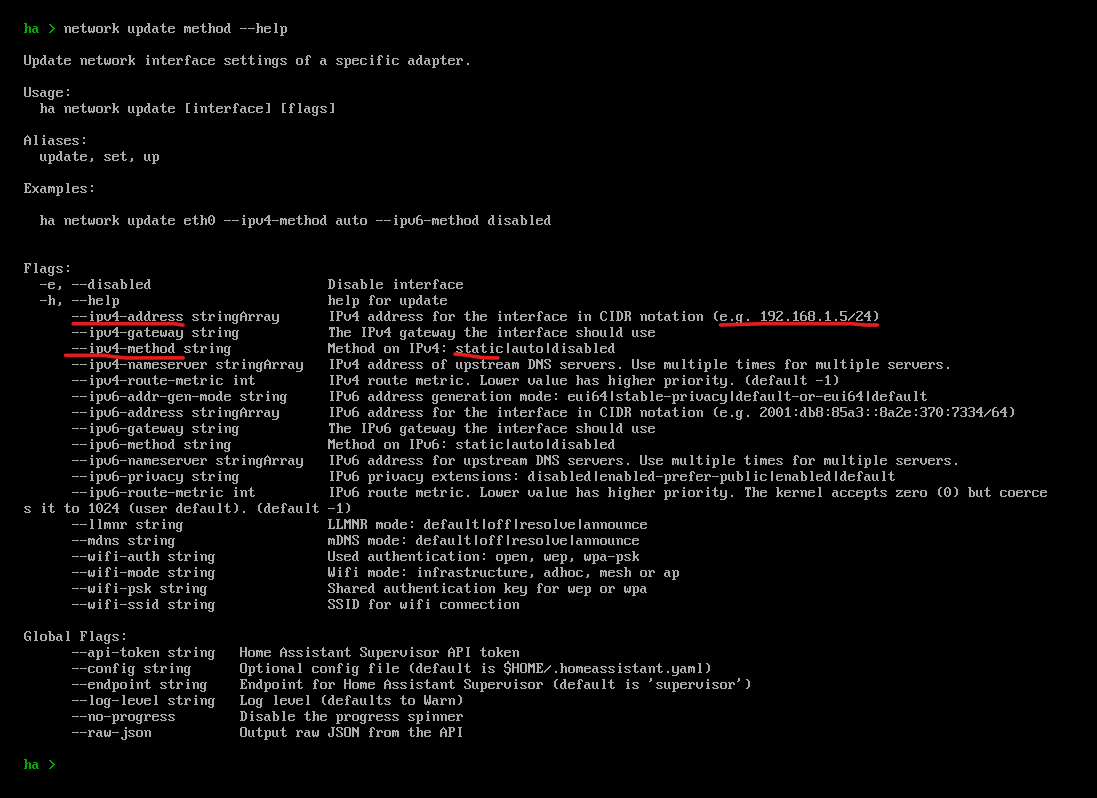
network update enp2s0 --ipv4-method auto --ipv6-method disabled
This means the IPv6 is disabled you need only IPv4 set to auto that means DHCP.
If you need to set up a fixed IP you need to set method static and set the ip address, using the highlighted commands.
Finally you have to set the Wi-Fi SSID and Wi-Fi password using the following command.
Remember to change the network interface, name SSID and password.
network update enp2s0 --wifi-auth wpa-psk --wifi-ssid WIFIXYZ123 --wifi-psk pwdwifi123After that type
exitto return the the top of the CLI.
And check ip the router has give a new ip address to the HA server.
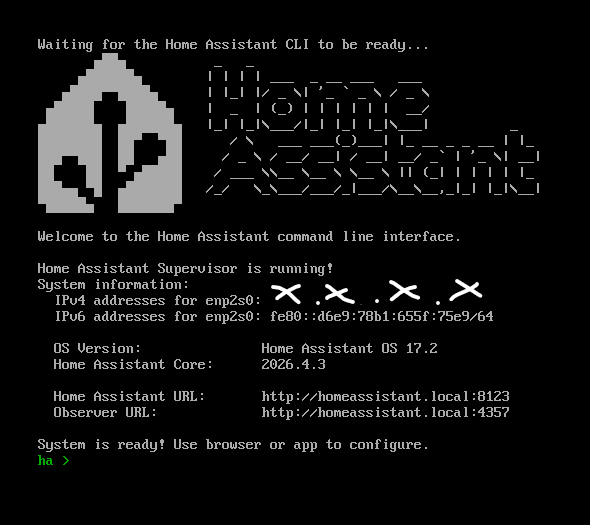
Finally you can enter the webserver running locally at the following address.
http://homeassistant.local:8123or, using the actual ip:
http://192.168.X.Y:8123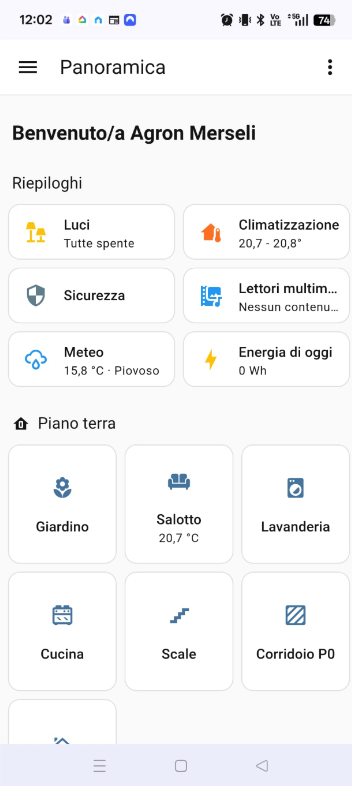

Lavalamp menù usando CSS3
Esempio di un menù semplice in stile lavalamp creato utilizzando soltanto attributi e proprietà CSS.
CSS3
nav.lavalamp {
	margin: 27px auto 0;
	position: relative;
	width: 590px;
	height: 50px;
	background-color: #34495e;
	border-radius: 8px;
	font-size: 0;
}
nav.lavalamp a {
	line-height: 50px;
	height: 100%;
	font-size: 15px;
	display: inline-block;
	position: relative;
	z-index: 1;
	text-decoration: none;
	text-transform: uppercase;
	text-align: center;
	color: white;
	cursor: pointer;
}
nav.lavalamp .animation {
	position: absolute;
	height: 100%;
	top: 0;
	z-index: 0;
	transition: all .5s ease 0s;
	border-radius: 8px;
}
nav.lavalamp a:nth-child(1) {
	width: 100px;
}
nav.lavalamp a:nth-child(2) {
	width: 110px;
}
nav.lavalamp a:nth-child(3) {
	width: 100px;
}
nav.lavalamp a:nth-child(4) {
	width: 160px;
}
nav.lavalamp a:nth-child(5) {
	width: 120px;
}
nav.lavalamp .start-home, a:nth-child(1):hover~.animation {
	width: 100px;
	left: 0;
	background-color: #1abc9c;
}
nav.lavalamp .start-about, a:nth-child(2):hover~.animation {
	width: 110px;
	left: 100px;
	background-color: #e74c3c;
}
nav.lavalamp .start-blog, a:nth-child(3):hover~.animation {
	width: 100px;
	left: 210px;
	background-color: #3498db;
}
nav.lavalamp .start-portefolio, a:nth-child(4):hover~.animation {
	width: 160px;
	left: 310px;
	background-color: #9b59b6;
}
nav.lavalamp .start-contact, a:nth-child(5):hover~.animation {
	width: 120px;
	left: 470px;
	background-color: #e67e22;
}
HTML
<h1>Lavalamp CSS Menu</h1>

<nav class="lavalamp">
	<a href="#">Home</a>
	<a href="#">About</a>
	<a href="#">Blog</a>
	<a href="#">Portefolio</a>
	<a href="#">Contatti</a>
	<div class="animation start-home"></div>
</nav>
Lavalamp Menu CSS3

CSS utilizzo smart della proprietà Background-Position
Introduzione
In genere questa proprietà serve a muovere un'immagine di sfondo oppure una gradazione di colore all'interno del suo contenitore.
Esempio codice:
html {
  background-position: 100px 5px;
}
Per maggiori informazioni riguardo questa proprietà rimando al link di W3Schools.
Come inserire più immagini in una pagina web con un solo file immagine
Nel mio caso l'ho utilizzato per muovere un immagine che contiene diverse icone alla stessa dimensione (32px x 32px), le ho allineate con Photoshop in modo da creare un rettangolo 3 x 4 icone con una dimensione totale di 96px x 128px con questo risultato finale.

A questo punto dentro l'HTML ho creato diversi div tanti quante le icone da mostrare, ho associato agli elementi div la classe .sw-item con questi parametri di stile.
.item-sw{
	width: 32px;
	height: 32px;
	margin: 10px 10px;
	display: inline-block;
	background-repeat: no-repeat;
	vertical-align: middle;
	background-image: url('sw_96_128.png');
}
Notare come ogni elemento div è un blocco di altezza e larghezza fisse di 32px tanto quanto saranno le singole icone nel file immagine.
In ogni div mi sono mosso dando un attributo di stile in html in x e y della dimensione corretta per inquadrare l'icona interessata, l'origine x=0 e y=0 dell'immagine è nell'angolo in alto a sinistra.

Il codice HTML risulta scritto in questa maniera.
<!doctype html>

<html lang="en">
	<head>
  <meta charset="utf-8">

  <title>Test CSS Background-Position</title>
  <meta name="description" content="TestCSS Background-Position">
  <meta name="author" content="Agron Merseli">

	<style type="text/css">
		.item-sw{
			width: 32px;
			height: 32px;
			margin: 10px 10px;
			display: inline-block;
			background-repeat: no-repeat;
			vertical-align: middle;
			background-image: url('sw_96_128.png');
		}
	</style>
</head>

<body>

	<div class="item-sw" style="background-position: 0 0;"></div>
	<div class="item-sw" style="background-position: -32px 0;"></div>
	<div class="item-sw" style="background-position: -64px 0;"></div>
	<br>
	<div class="item-sw" style="background-position: 0 -32px;"></div>
	<div class="item-sw" style="background-position: -32px -32px;"></div>
	<div class="item-sw" style="background-position: -64px -32px;"></div>
	<br>
	<div class="item-sw" style="background-position: 0 -64px;"></div>
	<div class="item-sw" style="background-position: -32px -64px;"></div>
	<div class="item-sw" style="background-position: -64px -64px;"></div>
	<br>
	<div class="item-sw" style="background-position: 0 -96px;"></div>
	<div class="item-sw" style="background-position: -32px -96px;"></div>
	<div class="item-sw" style="background-position: -64px -96px;"></div>

</body>
</html>
Il risultato finale dopo l'elaborazione del browser.

Conclusione
Il motivo principale per utilizzare questo metodo di accorpamento immagini l'ho trovato utile quando le icone da mostrare sono tante e della stessa dimensione e sono da mostrare in varie parti del sito. In questo modo il server non verrà appesantito da molteplici richieste per tutti i singoli file d'immagine e nella memoria cache verrà memorizzato un file unico d'immagine il quale velocizzerà l'apertura e la visualizzazione delle pagine web nel client.

Python Scripts per Notepad++
A volte lavorando su differenti piattaforme mi è capitato di dover spostare sorgenti da un posto ad un altro, solitamente questa semplice operazione di copia-incolla non comporta problemi, però se si lavora con Eclipse, i sorgenti sono trattati come semplici file di testo per cui la codifica diventa importante per evitare sorprese soprattutto se i sorgenti sono molti.

Solitamente in Eclipse i file di testo sono codificati come "Cp1252", quindi se si utilizzano i caratteri latini classici è necessario che i file siano codificati in UTF-8 e la prima opzione da modificare nell'IDE è la seguente.
In Windows – Preferences – General – Workspace – Text file encoding, seleziona Other: UTF-8

A questo punto procedere con l'importazione dei sorgenti nel progetto.
Se i sorgenti dovessero essere già stati importati è necessario convertirli alla codifica corretta.
Ed è qui che entra in gioco un tool molto utile per eseguire delle macro e script scritti in Python su Notepad++, il plugin si chiama Python Script e si installa dal Plugin Manager di Notepad++.

Per creare un nuovo script dal menù Plugin - Python Script - New Script, dare un nome allo script che si vuole creare.
In this case, the script to convert the encoding of files into UTF-8 with BOM is as follows.
import os;
import sys;
filePathSrc="D:\\eclipse\\eclipse-workspace\\LibroJava11\\src\\LibroJava*11"
for root, dirs, files in os.walk(filePathSrc):
    for fn in files:
      if fn[-4:] != '.jar' and fn[-5:] != '.ear' and fn[-4:] != '.gif' and fn[-4:] != '.jpg' and fn[-5:] != '.jpeg' and fn[-4:] != '.xls' and fn[-4:] != '.GIF' and fn[-4:] != '.JPG' and fn[-5:] != '.JPEG' and fn[-4:] != '.XLS' and fn[-4:] != '.PNG' and fn[-4:] != '.png' and fn[-4:] != '.cab' and fn[-4:] != '.CAB' and fn[-4:] != '.ico':
        notepad.open(root + "\\" + fn)
        console.write(root + "\\" + fn + "\r\n")
        #Does not work --> notepad.runMenuCommand("Encoding", "Character sets", "Chinese", "GB2312 (Simplified)")
        # notepad.menuCommand(MENUCOMMAND.FORMAT_GB2312)
        # notepad.runMenuCommand("Encoding", "Convert to UTF-8-BOM")
        notepad.menuCommand(MENUCOMMAND.FORMAT_CONV2_UTF_8)
        # Reference: https://github.com/bruderstein/PythonScript/blob/master/PythonScript/src/NotepadPython.cpp
        notepad.save()
        notepad.close()
Notare come nella stringa "filePathSrc" ho inserito il percorso contenente i sorgenti e col metodo "notepad.menuCommand" viene passato come comando "MENUCOMMAND.FORMAT_CONV2_UTF_8" che codifica il file.
Salvare lo script una volta completo.

Per lanciare lo script dal menu Plugins – Python Scripts – Script e selezionare lo script creato.

A questo punto ricaricato il sorgente dentro Eclipse si può verificare che la codifica del sorgente è corretta.

Per maggiori informazioni riguardo il plugin Python Scripts e per molti altri script utili consultare la pagina GitHub dello sviluppatore.
Rinomina ConvertToUFT-8-BOM.txt in ConvertToUFT-8-BOM.py

Poster fondamenti elettronica
Two posters of 2726x3652px dimensions containing the fundamental references of the electronic components and the basic symbols.


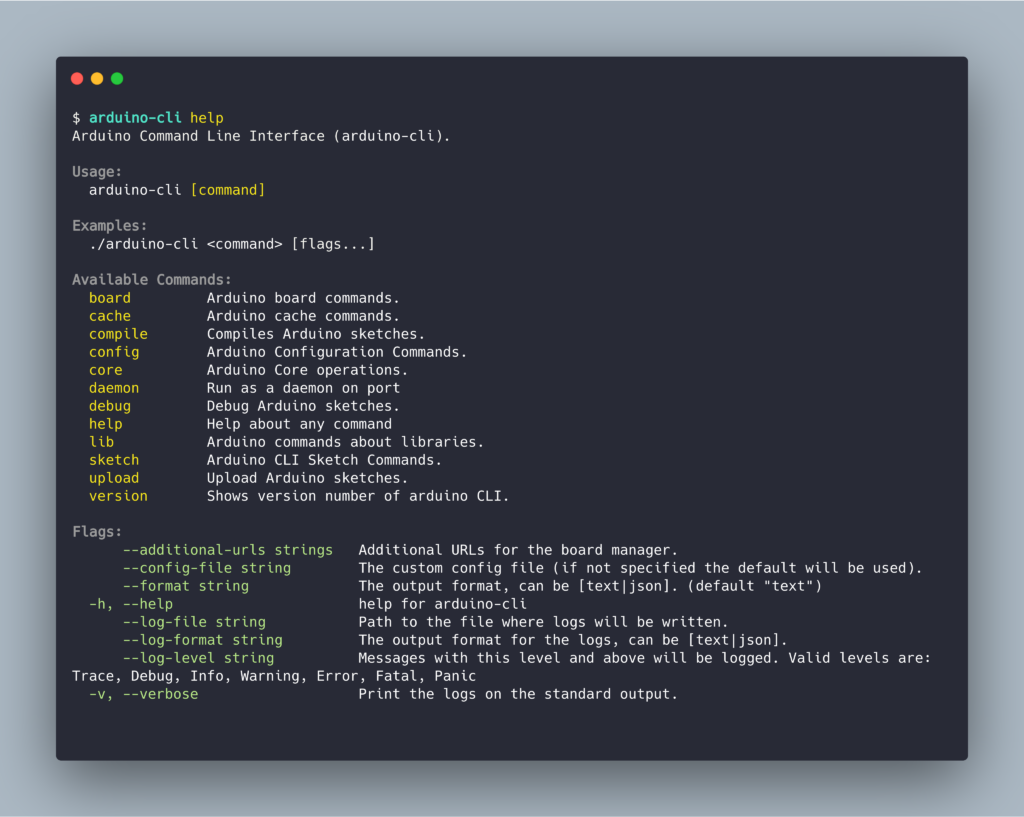
Arduino CLI è ora disponibile


- L'IA può portare all'estinzione, l'allerta di decine di ricercatori 2023-05-30Tra i firmatari gli ad di OpenAI e Google Deepmind, ci sono anche italiani tra cui l'esperto di tecnologie dell'informazione Luca Simoncini
- Le fake-news diffuse dai pregiudizi, non dai motori di ricerca 2023-05-30Lo indica uno studio condotto su Google
- L'e-commerce in Italia vale 54 miliardi nel 2023 2023-05-30Fondazione sostenibilità digitale: "Acquisti in aumento del 13%"
- OpenAI, fondo da 1 milione di dollari per regolamentare l'IA 2023-05-30Lo sviluppatore di ChatGpt sovvenziona ricercatori e aziende
- Apple risarcirà proprietari di MacBook per le tastiere difettose 2023-05-30Giudice Usa ha dato via libera all'intesa da 50 milioni di dollari