


Home Assistant set up VM Wi-Fi connection via CLI
2026-04-20 – Agron Merseli
Open Virtual Network Editor from VMware Workstation.
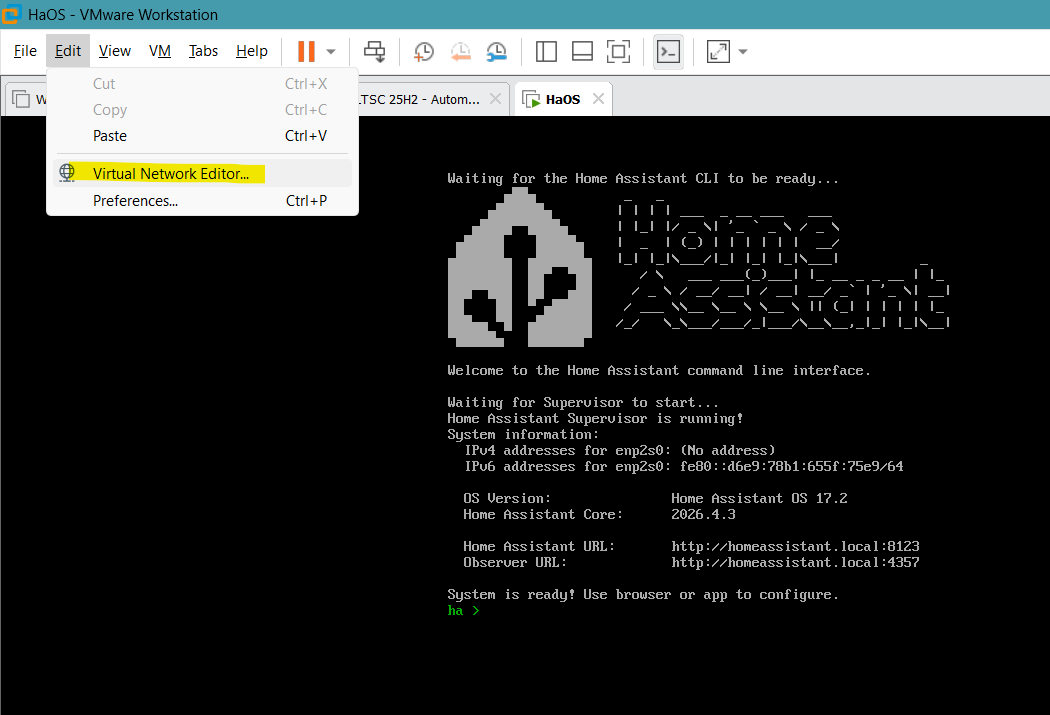
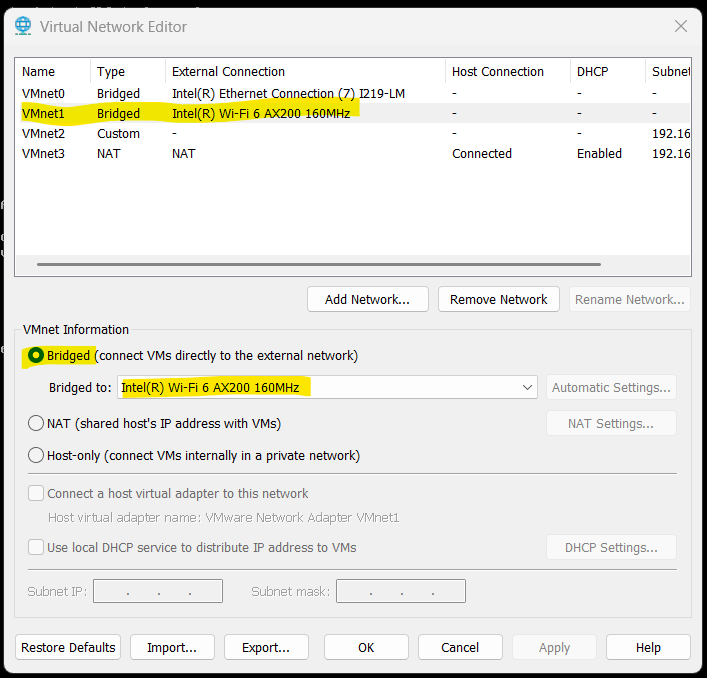
Set up the network as bridged to the Wi-Fi card.
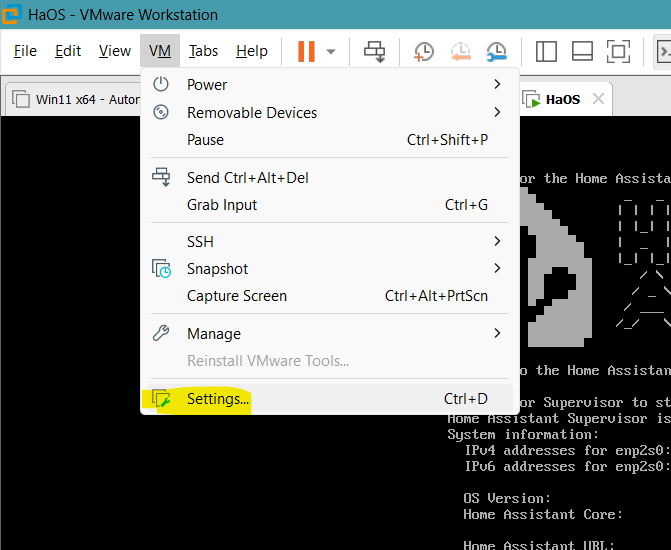
Enter the VM settings.
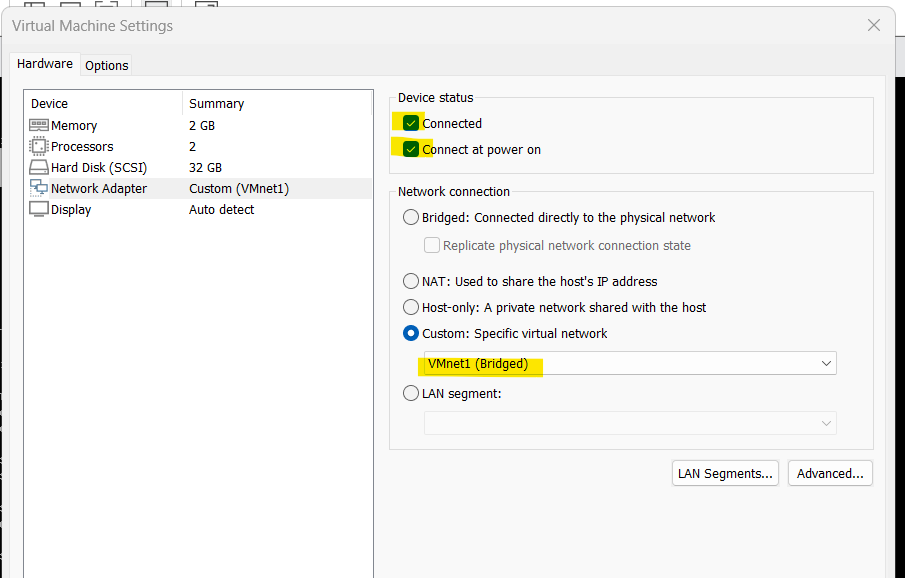
Select the virtual network.
Restart the machine.
Check if the router has not give any ip address.
Note the name of the network interface, in this case is enp2s0, this will not change also if you move the Vm to another machine.
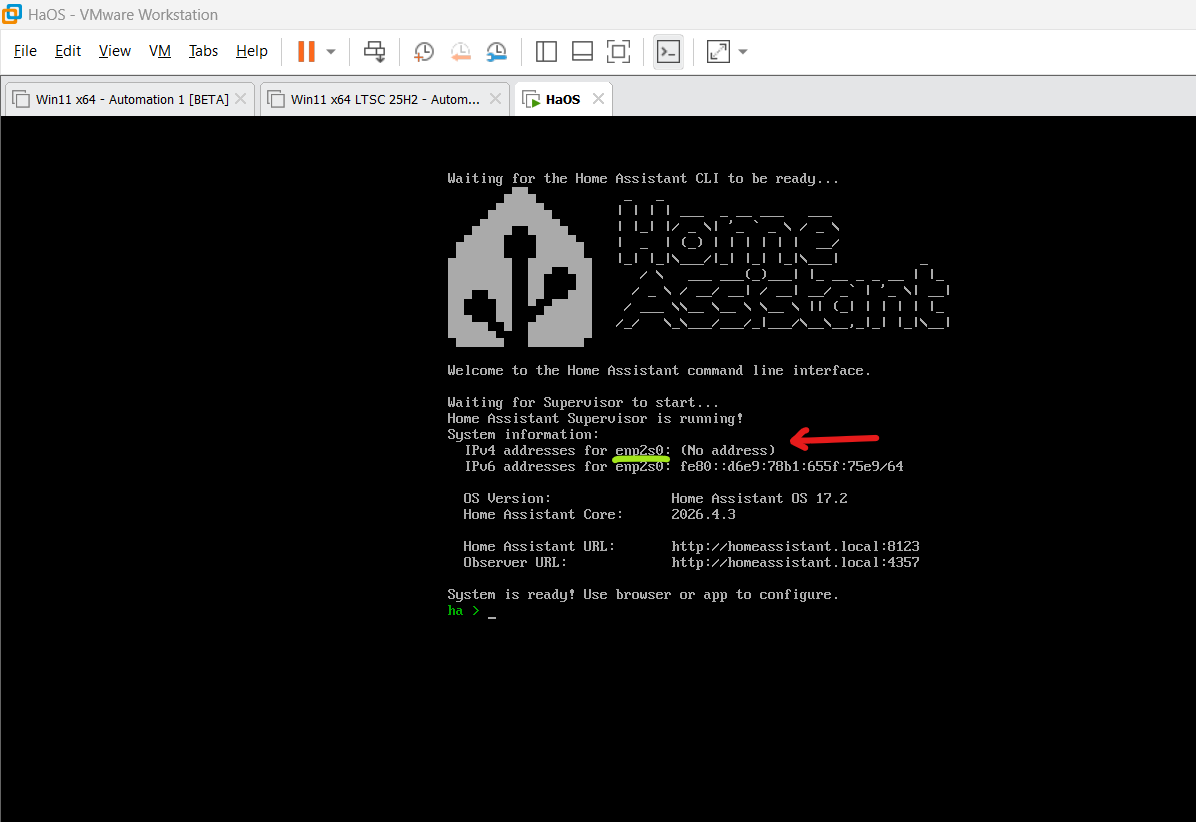
Now type the follow lines to permit to HA to connect to the existing Wi-Fi connection.
network infoCheck if network interface has no ip
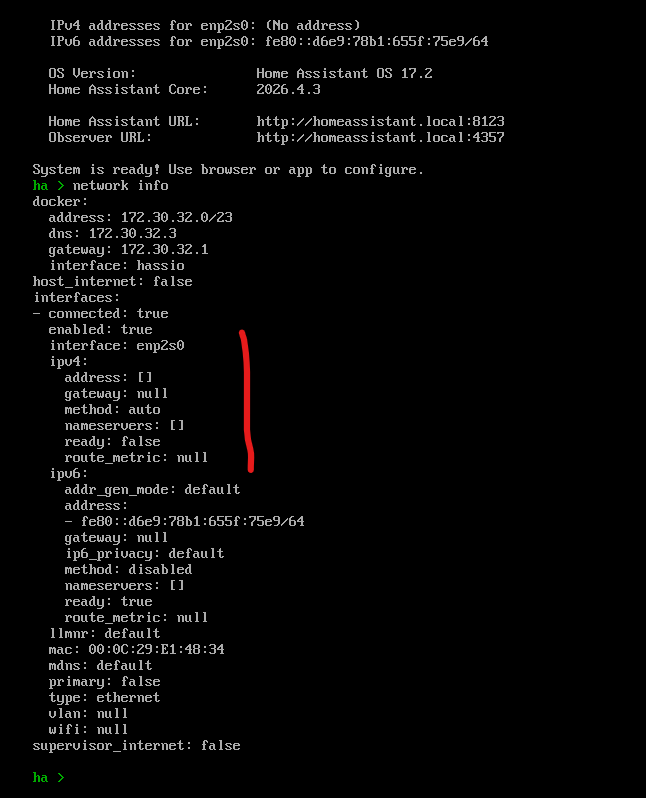
Now type the following command (remember to rename the interface)
network update enp2s0 --ipv4-method auto --ipv6-method disabled
This means the IPv6 is disabled you need only IPv4 set to auto that means DHCP.
If you need to set up a fixed IP you need to set method static and set the ip address, using the highlighted commands.
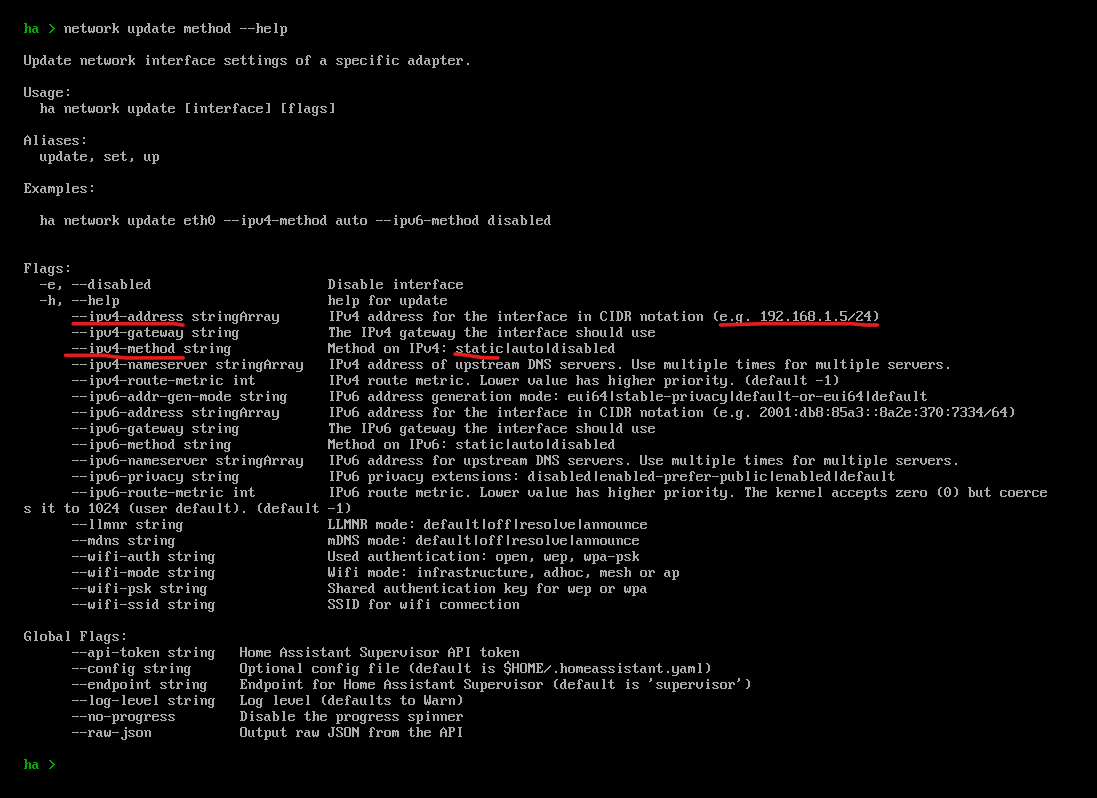
Finally you have to set the Wi-Fi SSID and Wi-Fi password using the following command.
Remember to change the network interface, name SSID and password.
network update enp2s0 --wifi-auth wpa-psk --wifi-ssid WIFIXYZ123 --wifi-psk pwdwifi123After that type
exitto return the the top of the CLI.
And check ip the router has give a new ip address to the HA server.
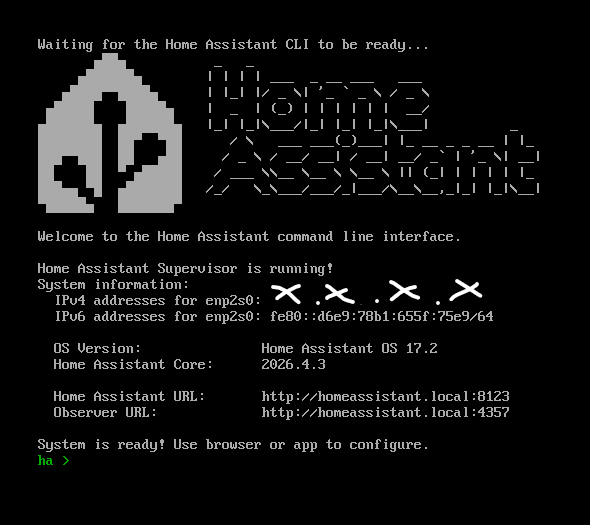
Finally you can enter the webserver running locally at the following address.
http://homeassistant.local:8123or, using the actual ip:
http://192.168.X.Y:8123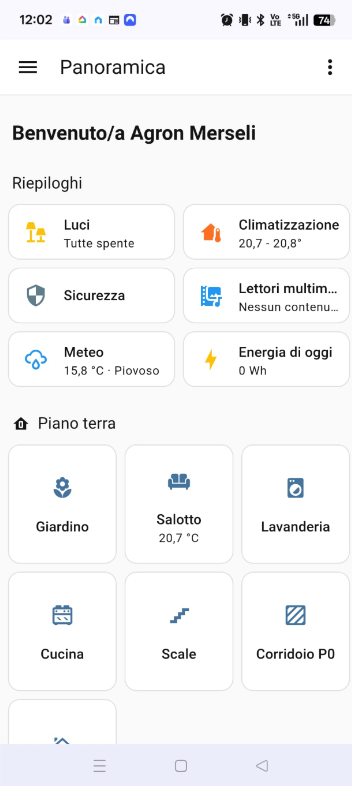

Lavalamp menu using CSS3
Example of a simple menu in lavalamp style written using only CSS attributes and properties.
CSS3
nav.lavalamp {
	margin: 27px auto 0;
	position: relative;
	width: 590px;
	height: 50px;
	background-color: #34495e;
	border-radius: 8px;
	font-size: 0;
}
nav.lavalamp a {
	line-height: 50px;
	height: 100%;
	font-size: 15px;
	display: inline-block;
	position: relative;
	z-index: 1;
	text-decoration: none;
	text-transform: uppercase;
	text-align: center;
	color: white;
	cursor: pointer;
}
nav.lavalamp .animation {
	position: absolute;
	height: 100%;
	top: 0;
	z-index: 0;
	transition: all .5s ease 0s;
	border-radius: 8px;
}
nav.lavalamp a:nth-child(1) {
	width: 100px;
}
nav.lavalamp a:nth-child(2) {
	width: 110px;
}
nav.lavalamp a:nth-child(3) {
	width: 100px;
}
nav.lavalamp a:nth-child(4) {
	width: 160px;
}
nav.lavalamp a:nth-child(5) {
	width: 120px;
}
nav.lavalamp .start-home, a:nth-child(1):hover~.animation {
	width: 100px;
	left: 0;
	background-color: #1abc9c;
}
nav.lavalamp .start-about, a:nth-child(2):hover~.animation {
	width: 110px;
	left: 100px;
	background-color: #e74c3c;
}
nav.lavalamp .start-blog, a:nth-child(3):hover~.animation {
	width: 100px;
	left: 210px;
	background-color: #3498db;
}
nav.lavalamp .start-portefolio, a:nth-child(4):hover~.animation {
	width: 160px;
	left: 310px;
	background-color: #9b59b6;
}
nav.lavalamp .start-contact, a:nth-child(5):hover~.animation {
	width: 120px;
	left: 470px;
	background-color: #e67e22;
}
HTML
<h1>Lavalamp CSS Menu</h1>

<nav class="lavalamp">
	<a href="#">Home</a>
	<a href="#">About</a>
	<a href="#">Blog</a>
	<a href="#">Portefolio</a>
	<a href="#">Contact</a>
	<div class="animation start-home"></div>
</nav>
Lavalamp Menu CSS3

CSS smart use of the Background-Position property
Introduction
Generally this property is used to move a background image or a gradation of color inside its container.
Code example:
html {
  background-position: 100px 5px;
}
For more information about this property, refer to the link of W3Schools.
How to insert multiple images into a web page with a single image file using the CSS Background-Position property.
In my case I used it to move an image that contains several icons at the same size (32px x 32px), I aligned them with Photoshop in order to create a rectangle 3 x 4 icons with a total size of 96px x 128px with this final result.

At this point in the HTML I created several divs as many as the icons to show, I associated the div elements with the .sw-item class with these style parameters.
.item-sw{
	width: 32px;
	height: 32px;
	margin: 10px 10px;
	display: inline-block;
	background-repeat: no-repeat;
	vertical-align: middle;
	background-image: url('sw_96_128.png');
}
Note in the code the div element is a block of fixed height and width of 32px as much as the individual icons in the image file will be.
In each div I moved giving an html style attribute in x and y of the correct size to frame the icon concerned, the origin x = 0 and y = 0 of the image is in the upper left corner.

The HTML code is written in this way.
<!doctype html>

<html lang="en">
	<head>
  <meta charset="utf-8">

  <title>Test CSS Background-Position</title>
  <meta name="description" content="TestCSS Background-Position">
  <meta name="author" content="Agron Merseli">

	<style type="text/css">
		.item-sw{
			width: 32px;
			height: 32px;
			margin: 10px 10px;
			display: inline-block;
			background-repeat: no-repeat;
			vertical-align: middle;
			background-image: url('sw_96_128.png');
		}
	</style>
</head>

<body>

	<div class="item-sw" style="background-position: 0 0;"></div>
	<div class="item-sw" style="background-position: -32px 0;"></div>
	<div class="item-sw" style="background-position: -64px 0;"></div>
	<br>
	<div class="item-sw" style="background-position: 0 -32px;"></div>
	<div class="item-sw" style="background-position: -32px -32px;"></div>
	<div class="item-sw" style="background-position: -64px -32px;"></div>
	<br>
	<div class="item-sw" style="background-position: 0 -64px;"></div>
	<div class="item-sw" style="background-position: -32px -64px;"></div>
	<div class="item-sw" style="background-position: -64px -64px;"></div>
	<br>
	<div class="item-sw" style="background-position: 0 -96px;"></div>
	<div class="item-sw" style="background-position: -32px -96px;"></div>
	<div class="item-sw" style="background-position: -64px -96px;"></div>

</body>
</html>
The final result after the browser processing.

Conclusion
The main reason to use this method of grouping images is when the icons to be shown are many and of the same size and are to be shown in various parts of the site. In this way the server will not be not overloaded by multiple requests for all the individual image files, and in the cache memory only one single image file will be stored which will speed up the opening and displaying of the web pages in the client.

Python Scripts for Notepad++
Sometimes working on different platforms happens to move sources from one place to another, usually this simple copy-paste operation does not cause problems, but if you work with Eclipse, the sources are treated as simple text files so the file encoding becomes important to avoid surprises especially if there are many sources.

Usually in Eclipse the text files are encoded as “Cp1252”, therefore if you use the classic Latin characters it is necessary that the files are encoded in “UTF-8” and the first option to modify in the IDE is the following.
In Windows – Preferences – General – Workspace – Text file encoding, select Other: UTF-8

At this point proceed importing the sources into the project.
If the sources have already been imported, it is necessary to convert them to the correct encoding.
Here you can use a very useful tool to run macros and scripts written in Python on Notepad++, the plugin is called Python Script and it can be installed from the Notepad++ Plugin Manager.

To create a new script from the Plugin – Python Script – New Script menu, give a name to the script you want to create.
In this case, the script to convert the encoding of files into UTF-8 with BOM is as follows.
import os;
import sys;
filePathSrc="D:\\eclipse\\eclipse-workspace\\LibroJava11\\src\\LibroJava*11"
for root, dirs, files in os.walk(filePathSrc):
    for fn in files:
      if fn[-4:] != '.jar' and fn[-5:] != '.ear' and fn[-4:] != '.gif' and fn[-4:] != '.jpg' and fn[-5:] != '.jpeg' and fn[-4:] != '.xls' and fn[-4:] != '.GIF' and fn[-4:] != '.JPG' and fn[-5:] != '.JPEG' and fn[-4:] != '.XLS' and fn[-4:] != '.PNG' and fn[-4:] != '.png' and fn[-4:] != '.cab' and fn[-4:] != '.CAB' and fn[-4:] != '.ico':
        notepad.open(root + "\\" + fn)
        console.write(root + "\\" + fn + "\r\n")
        #Does not work --> notepad.runMenuCommand("Encoding", "Character sets", "Chinese", "GB2312 (Simplified)")
        # notepad.menuCommand(MENUCOMMAND.FORMAT_GB2312)
        # notepad.runMenuCommand("Encoding", "Convert to UTF-8-BOM")
        notepad.menuCommand(MENUCOMMAND.FORMAT_CONV2_UTF_8)
        # Reference: https://github.com/bruderstein/PythonScript/blob/master/PythonScript/src/NotepadPython.cpp
        notepad.save()
        notepad.close()
Note that I entered the path containing the sources in the “filePathSrc” string and with the “notepad.menuCommand” method I passed the “MENUCOMMAND.FORMAT_CONV2_UTF_8” command which encodes the file.
Save the script once complete.

To launch the script from the Plugins – Python Scripts – Script menu and select the script created.

At this point, reloading the source into Eclipse it can be verified that the file encoding is now correct.

For more information about the Python Scripts plugin and for many other useful scripts visit the developer’s GitHub page.
Rename ConvertToUFT-8-BOM.txt to ConvertToUFT-8-BOM.py

Posters of fundamentals electronics
Two posters of 2726x3652px dimensions containing the fundamental references of the electronic components and the basic symbols.


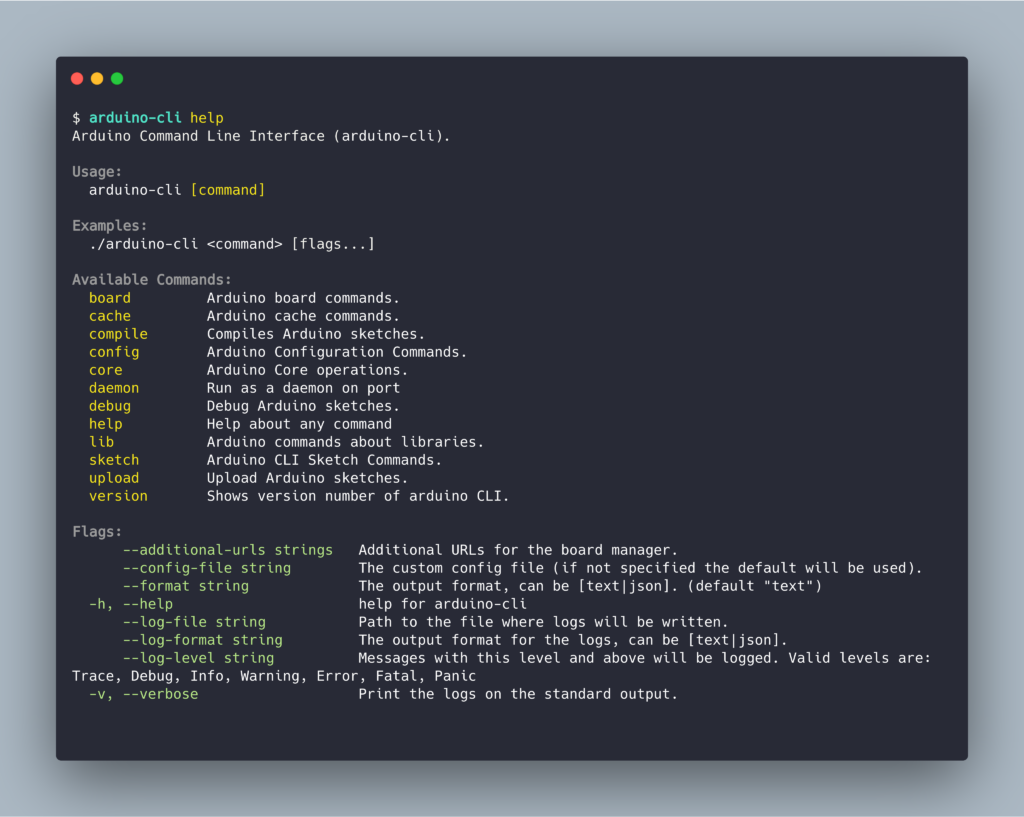
Arduino CLI is now live



- L'IA può portare all'estinzione, l'allerta di decine di ricercatori 2023-05-30Tra i firmatari gli ad di OpenAI e Google Deepmind, ci sono anche italiani tra cui l'esperto di tecnologie dell'informazione Luca Simoncini
- Le fake-news diffuse dai pregiudizi, non dai motori di ricerca 2023-05-30Lo indica uno studio condotto su Google
- L'e-commerce in Italia vale 54 miliardi nel 2023 2023-05-30Fondazione sostenibilità digitale: "Acquisti in aumento del 13%"
- OpenAI, fondo da 1 milione di dollari per regolamentare l'IA 2023-05-30Lo sviluppatore di ChatGpt sovvenziona ricercatori e aziende
- Apple risarcirà proprietari di MacBook per le tastiere difettose 2023-05-30Giudice Usa ha dato via libera all'intesa da 50 milioni di dollari